Tutorial
Step 1 - Introduction
This documentation is meant at developers wanting to use Angus.ai building blocks API services.
What the difference with other AI building blocks providers?
Angus.ai is focus 100% on turning existing 2D cameras into a new generation of monitoring and alerting tools, as a consequence these building blocks are optimized to work:
- on video streams
- in realtime
- and with low resolution 2D cameras
How it works
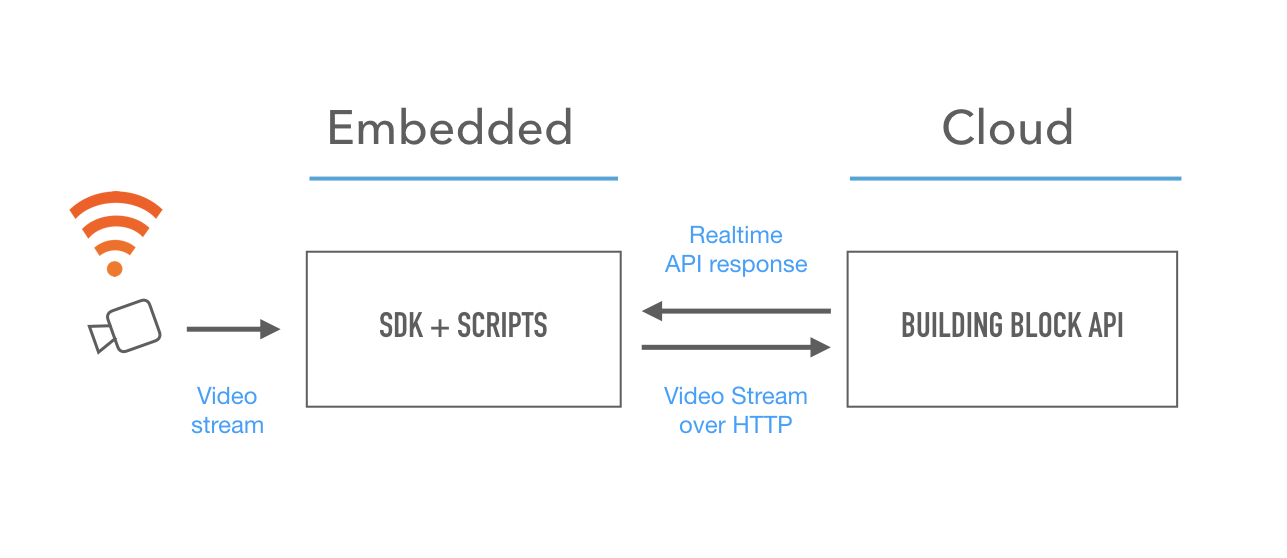
Angus.ai audience analytics solution is based on a (lightweight) Client / Server architecture as seen on the figure below. All CPU expensive computation are made on our dedicated servers making it possible to run the solution from about any CPU board that can retrieve a camera stream and connect to a server (eg. Raspberry).
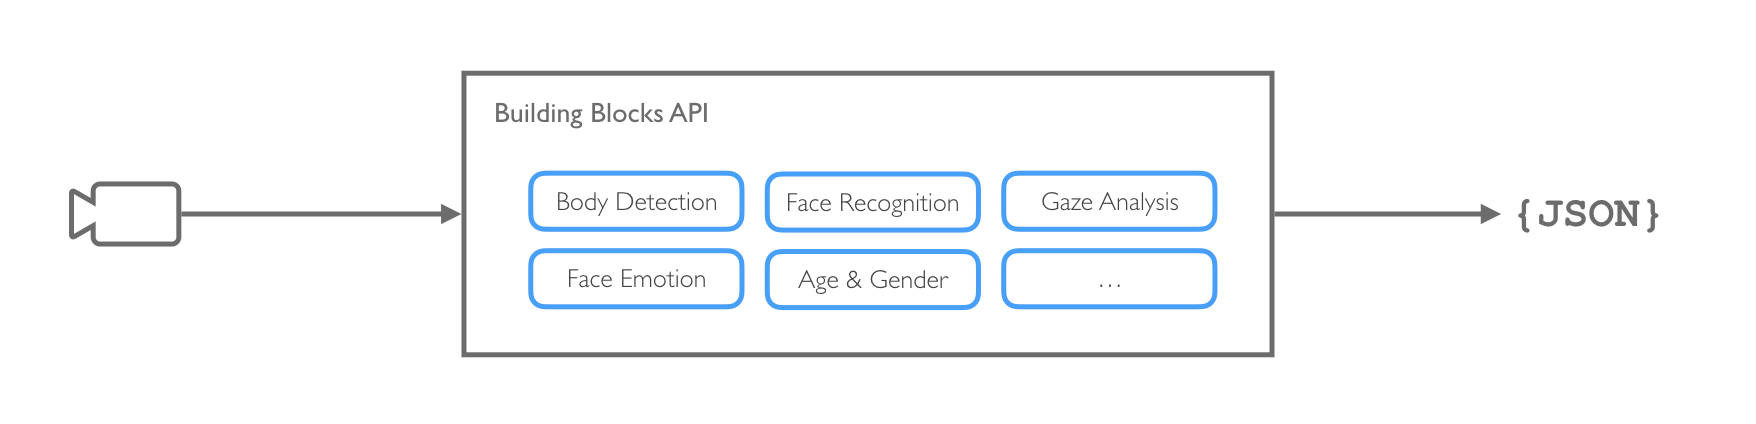
List of the available building blocks
Requirements
As you go through this tutorial, you will need:
- a computer. Every operating system is ok provided that you can configure a Python or Java stack.
- a camera (e.g. webcam) plugged into that computer. USB and IP cameras are supported, although IP cam can be more challenging to interface. If you need help doing so please contact us at support@angus.ai.
- a working internet connection.
Step 2 - Install our SDK
Create an account
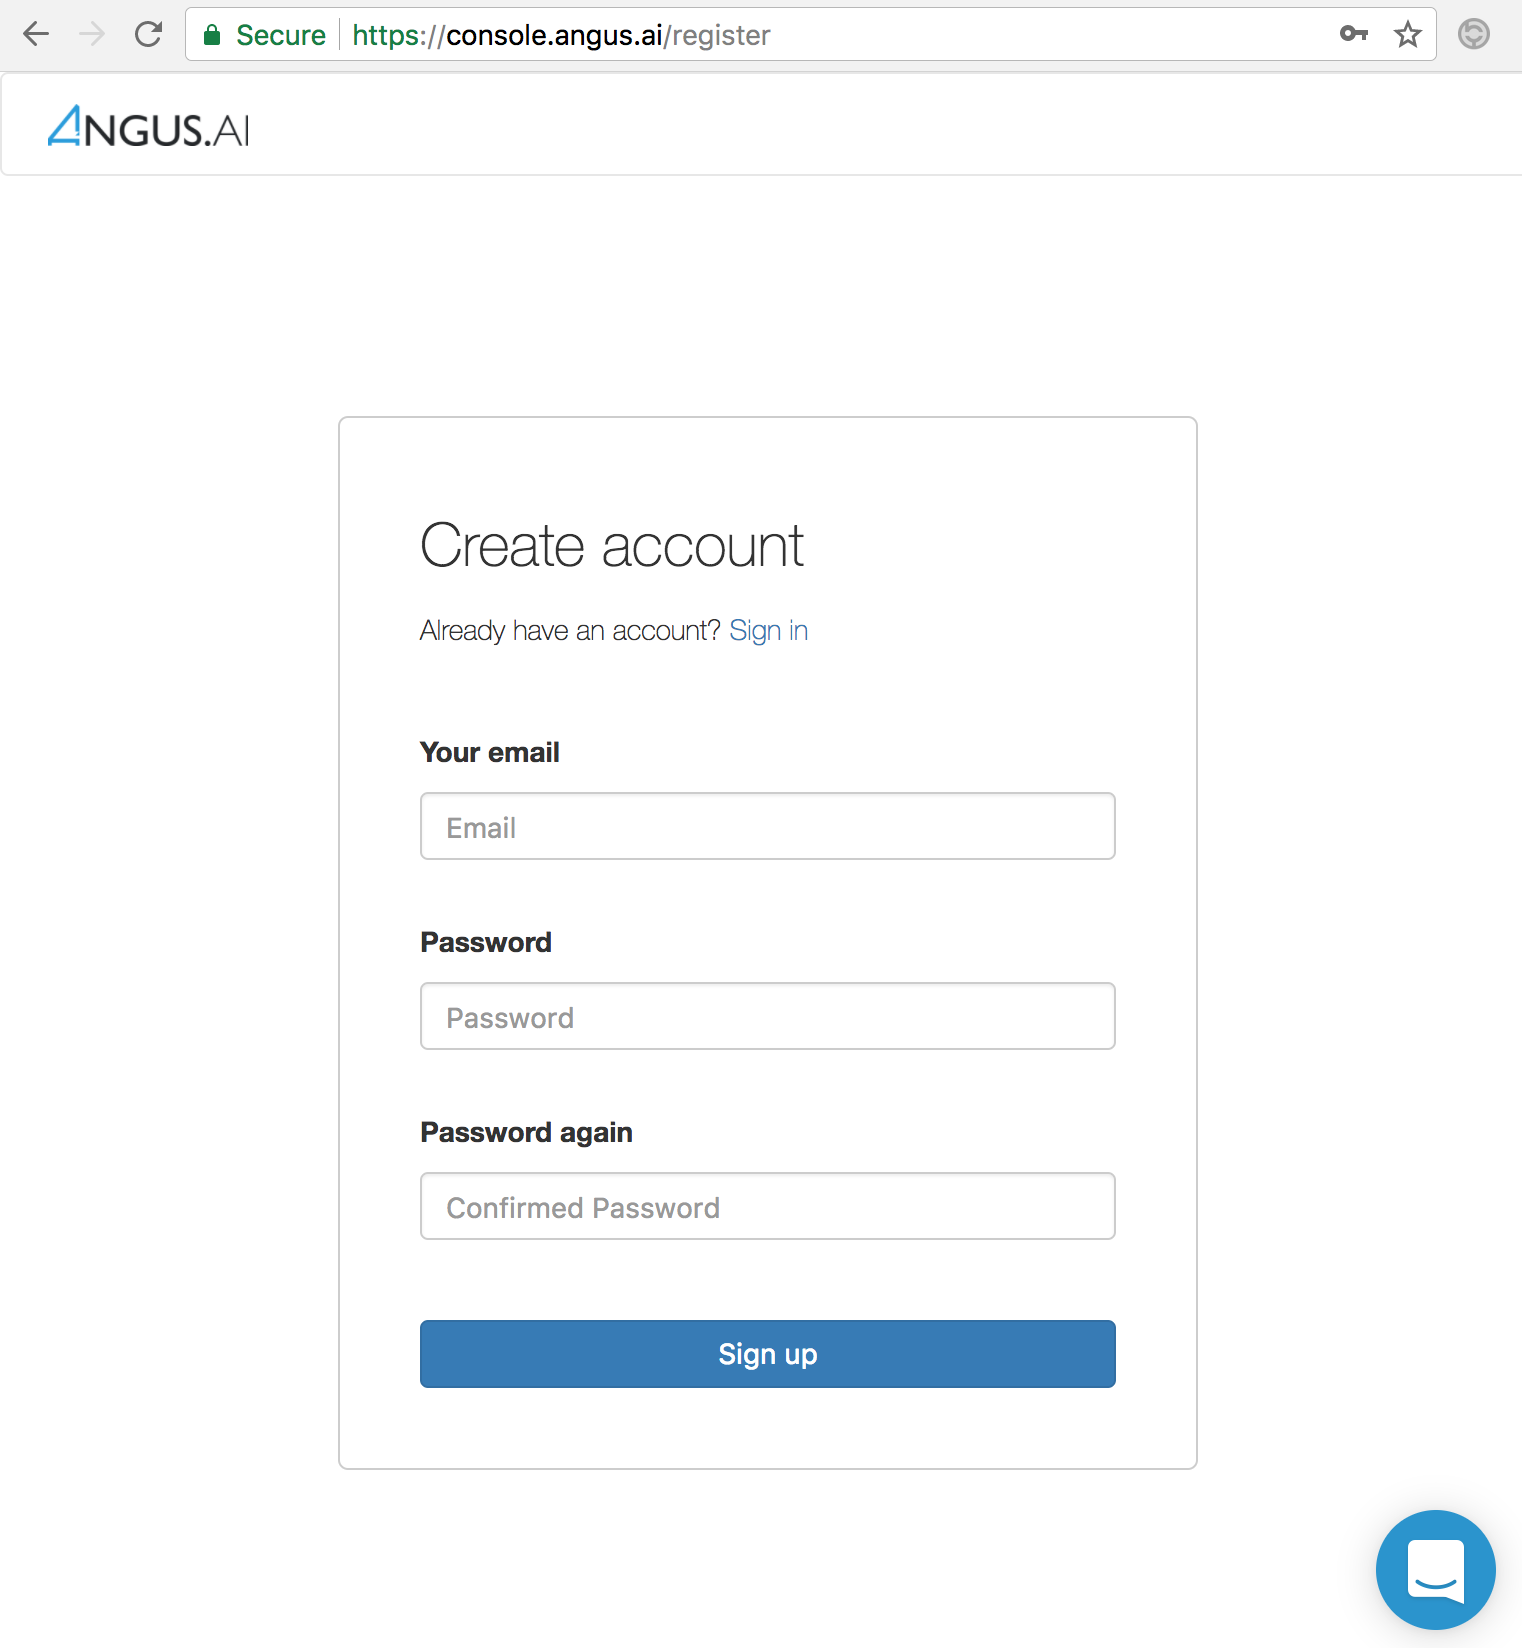
To use Angus.ai services, you need to create an account. This can be done very easily by visiting https://console.angus.ai and filling the form shown below.
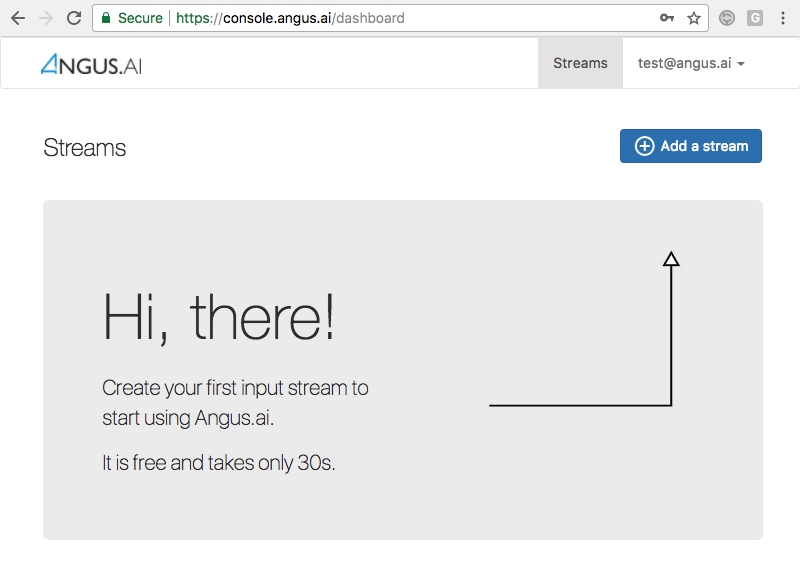
When done, you are ready to create you first camera stream as shown below.
Get credentials for your camera
After creating your personal account on https://console.angus.ai/, you will be asked to create a “stream”. This procedure will allow for a private “access_token” and “client_id” keys to be generated for you. This can be done by pressing the “Add a stream” button on the top right hand corner as shown below.
After clicking, you will be asked to choose between a free developer stream and a paying enterprise stream. Please note that the free developer stream is only for non commercial use and will block after 3 hours of video stream computed every month as seen below.
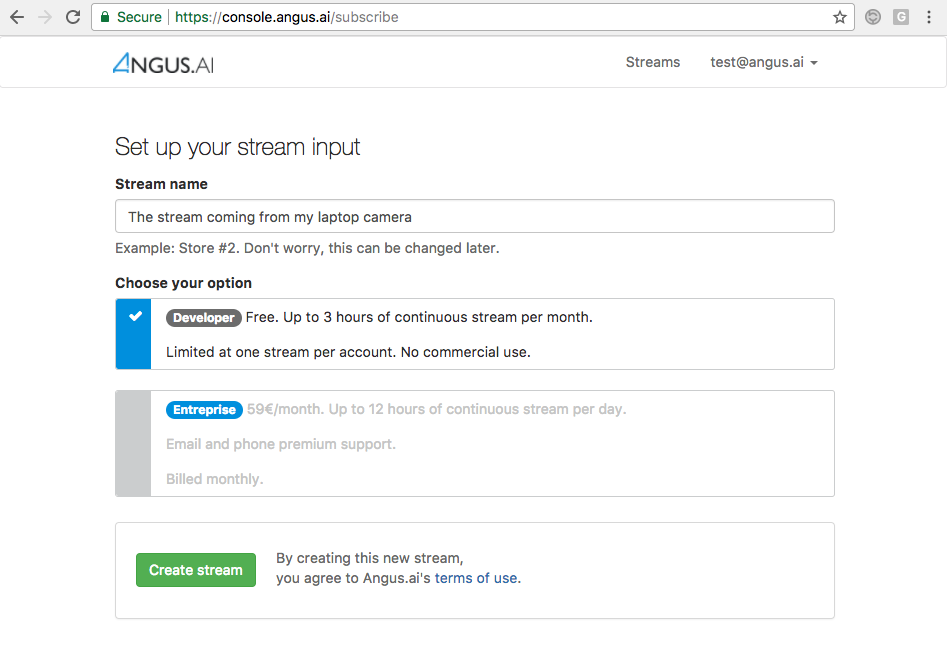
For an non restricted enterprise stream, you will need to enter a valid credit card number.
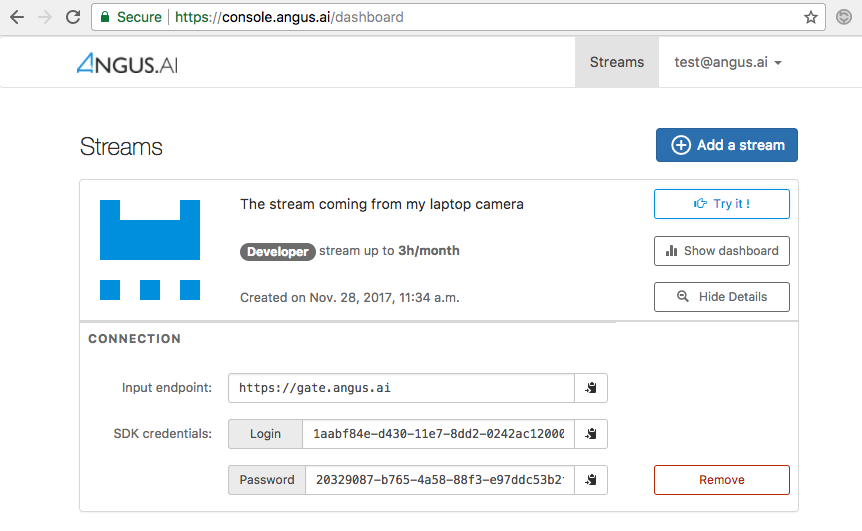
Press “Continue” at the bottom of the page and you will soon get the following page. Press “Show Details” and take note of your client_id (called Login on the interface) and access_token (called Password on the interface) as they will be needed later on.
The credentials that you have just created will be used to configure the Angus.ai SDK. Your are now ready to proceed to the next step.
Download and configure the SDK
Requirements
- The SDK is Python3 compatible but the documentation code snippets are only Python2 compatible.
- Also, you might want (not mandatory) to create a python virtual environnement with virtualenv in order to install the sdk in there.
To do so, please refer to the following virtualenv guide for more information.
Install the SDK
Open a terminal and install the angus python sdk with pip. If you do not use virtualenv you may need to be root, administrator or super user depending on your platform (use sudo on linux platform).
$ pip install angus-sdk-python
Configure your SDK
You must configure your sdk with the keys you received by creating a stream here. These keys are used to authenticate the requests you are about to send.
Your API credentials can be retrieved by clicking on “Show details” on the stream you just created.
In a terminal, type:
$ angusme
Please choose your gateway (current: https://gate.angus.ai):
Please copy/paste your client_id: xxxxxxxx-xxxx-xxxx-xxxx-xxxxxxxxxxxx
Please copy/paste your access_token: xxxxxxxx-xxxx-xxxx-xxxx-xxxxxxxxxxxx
Fill in the “client_id” prompt with the “login” given on the interface and the “access_token” prompt with the “password” given on the interface.
On Windows system, if angusme does not work, please refer to the FAQ for more details.
You can check this setup went well by typing the following command and checking that our server sees you:
$ angusme -t
Server: https://gate.angus.ai
Status: OK
If this command gives you an error, check that you enter the right “client_id” and “acccess_token”. You can do this by re-typing “angusme” in a command prompt.
If you need help, contact us here : support@angus.ai !
Step 3 - Pick your building block
What next?
Congratulations! You went through all the steps to use our building blocks.
- When time comes, you can plug more cameras by creating additional stream as shown here (Create new credentials).
- If you need to deploy your system in a situation where internet bandwidth is a problem, please contact us at support@angus.ai.
For any issues please contact Angus.ai team at: support@angus.ai, and if possible, please specify your operating system, Python version, as well as the error backtrace if any. Thanks!