Audience Analytics
Angus.ai Audience Analytics computes the traffic, interest and demographics metrics of a device (a screen, a kiosk, a specific shelf, etc...).
This data is automatically stored on a secured database and can be visualised in realtime on an online dashboard and/or retrieved programmatically through our API.
This documentation is meant for developers wanting to install, configure and launch Angus.ai audience analytics application on a screen player.
Step 1 - Introduction
What data can be retrieved
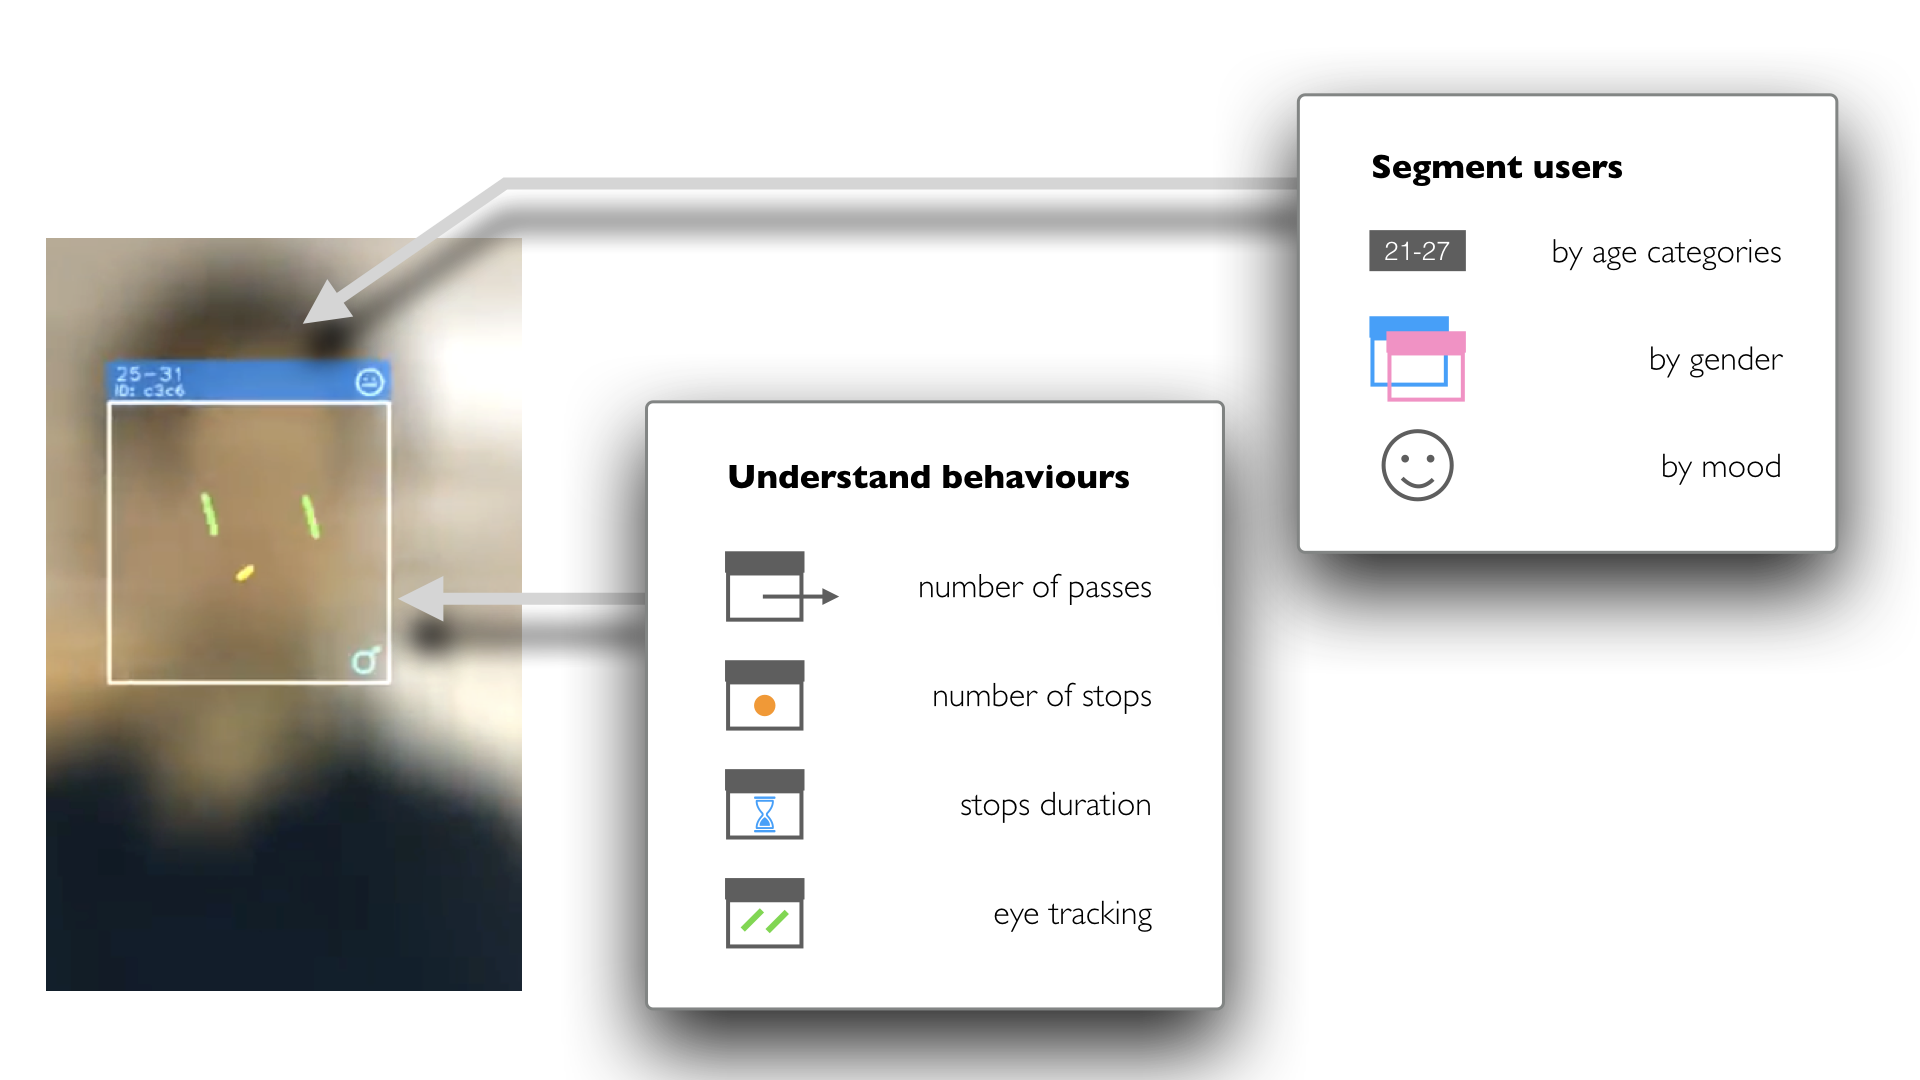
Angus.ai anonymous audience analytics solution computes (from each camera stream) the following metrics:
- The number of people passing by the camera/device,
- The number of people interested in the camera/device
- The time spent stopped in front of the camera/device
- The time spent looking at the camera/device
- The number of people interested by the camera/device, broken down by
demographics
- Age
- Gender
- Emotion
For more information about the metrics, see the page dedicated to the metrics.
How it works
Angus.ai audience analytics solution is based on a (lightweight) Client / Server architecture as seen on the figure below. All CPU expensive computation are made on our dedicated servers making it possible to run the solution from about any CPU board that can retrieve a camera stream and connect to a server (eg. Raspberry).
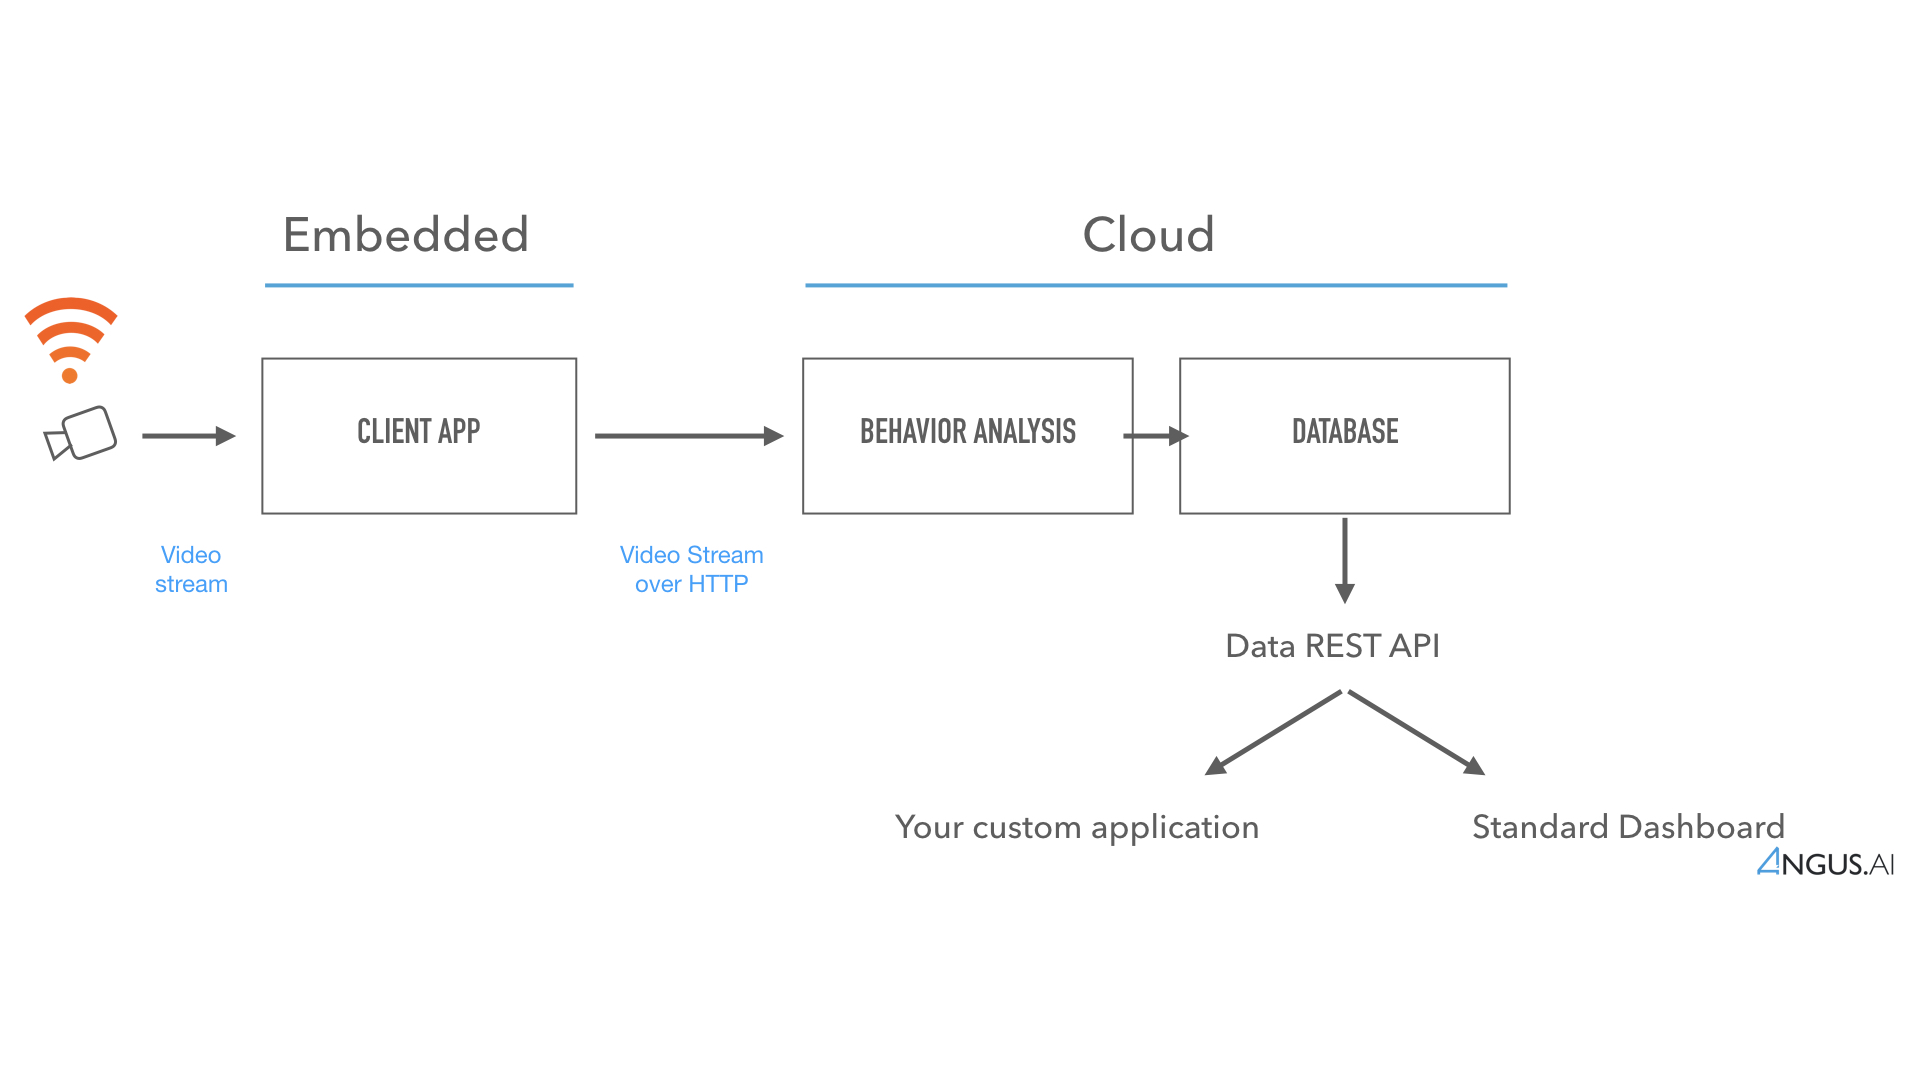
Once properly installed and configured, this application will interact with Angus.ai cloud based algorithms to provide audience metrics that can be retrieve through a REST API. This tutorial will show how to do it.
Requirements
As you go through this tutorial, you will need:
- a computer. Every operating system is ok provided that you can configure a proper Python stack.
- a camera (e.g. webcam) plugged into that computer. USB and IP cameras are supported, although IP cam can be more challenging to interface.
- a working internet connection. An upload bandwidth of about 400ko/sec is advised. If this is a problem, we are able to provide an “hybrid” version of our solution, where part of the CPU expensive computation is done locally, alleviating connection bandwidth requirements. Please contact us at support@angus.ai.
Step 2 - Set up your player
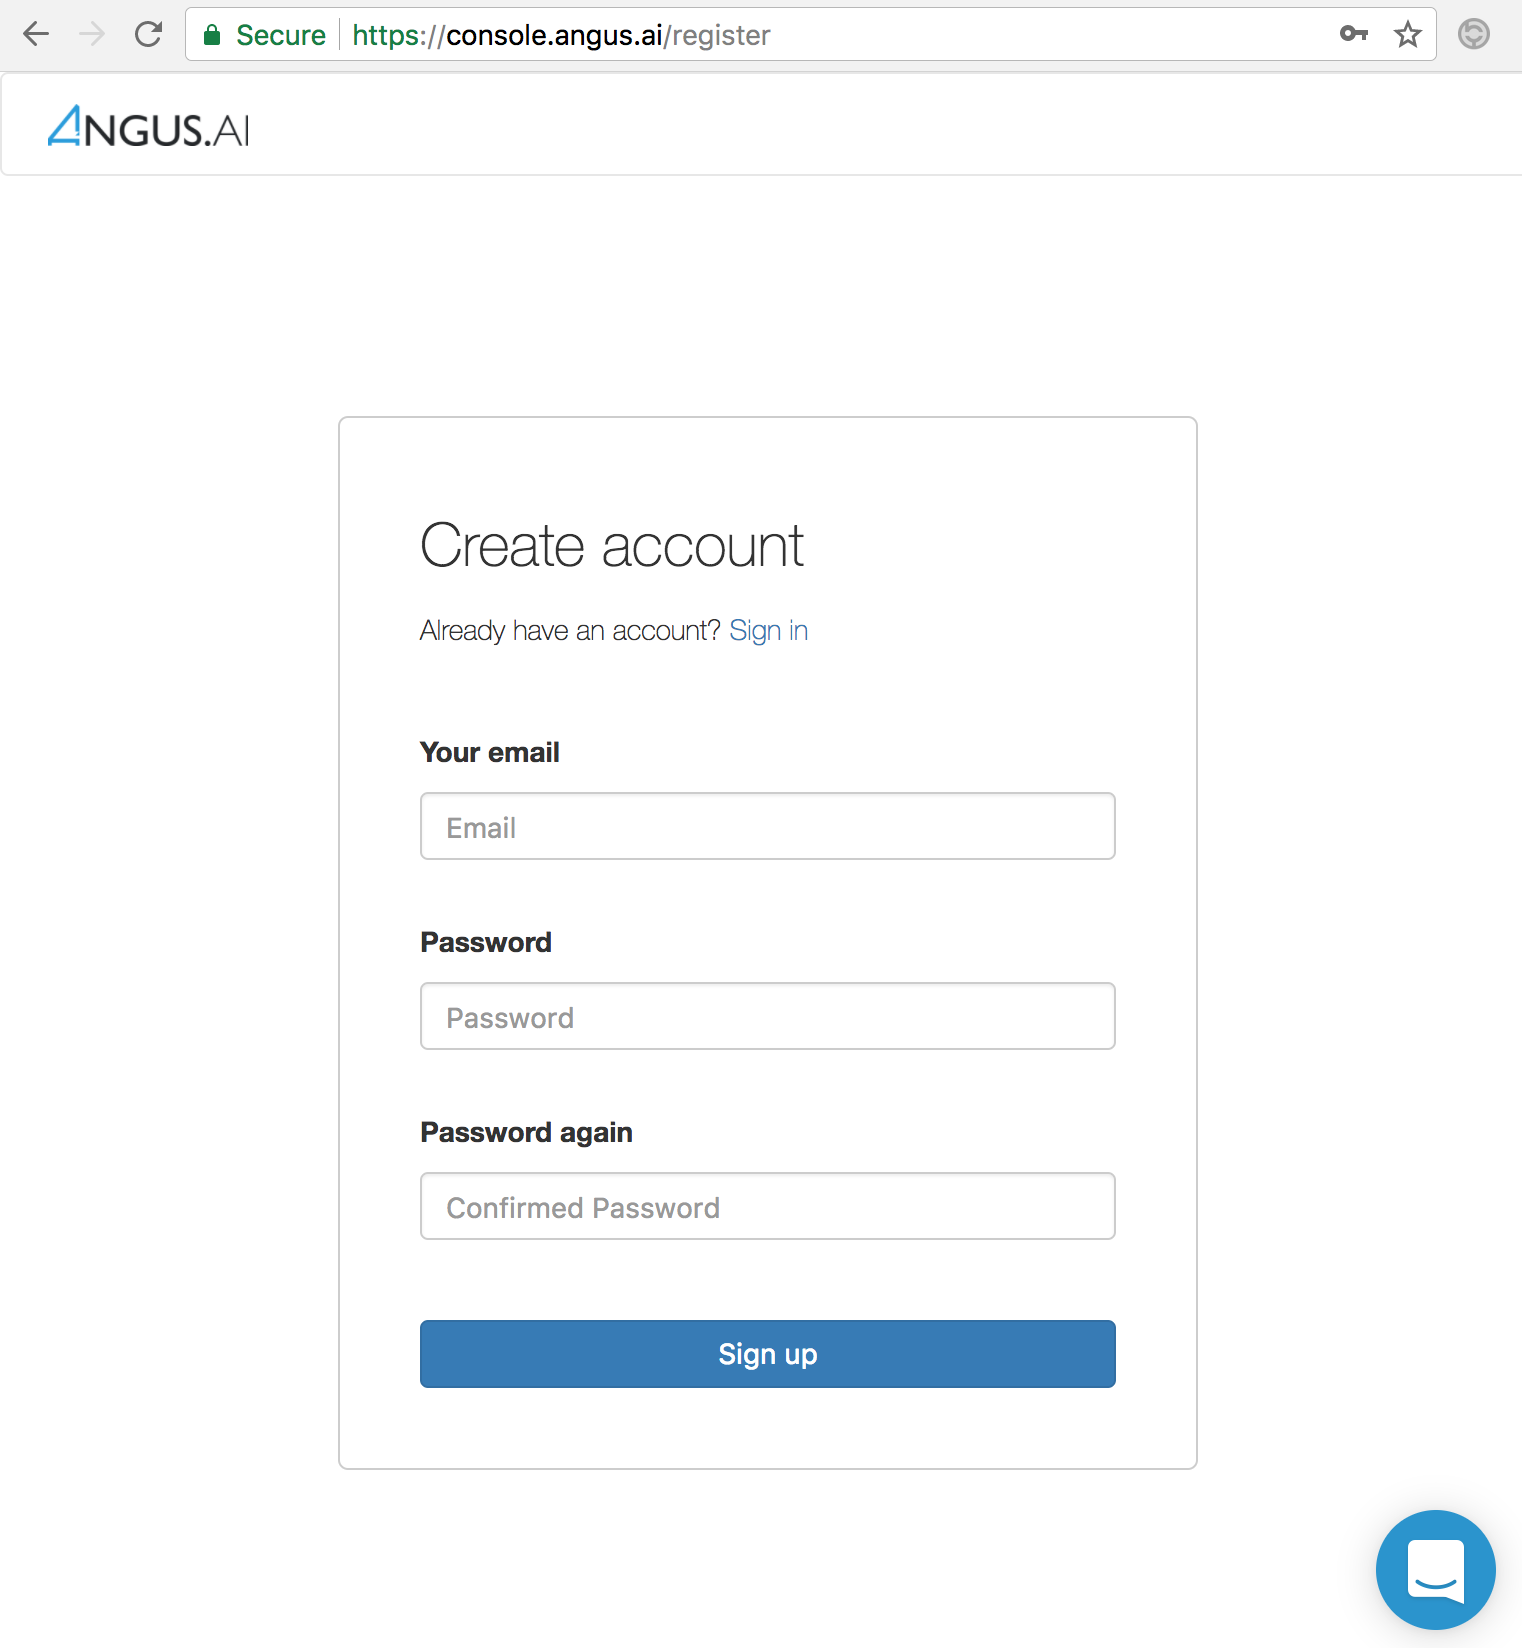
Create an account
To use Angus.ai services, you need to create an account. This can be done very easily by visiting https://console.angus.ai and filling the form shown below.
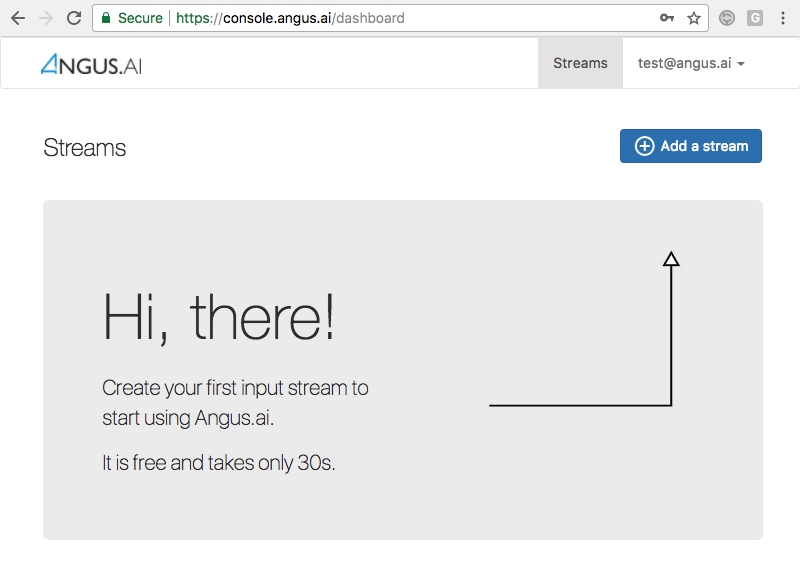
When done, you are ready to create you first camera stream as shown below.
Get credentials for your camera
After creating your personal account on https://console.angus.ai/, you will be asked to create a “stream”. This procedure will allow for a private “access_token” and “client_id” keys to be generated for you. This can be done by pressing the “Add a stream” button on the top right hand corner as shown below.
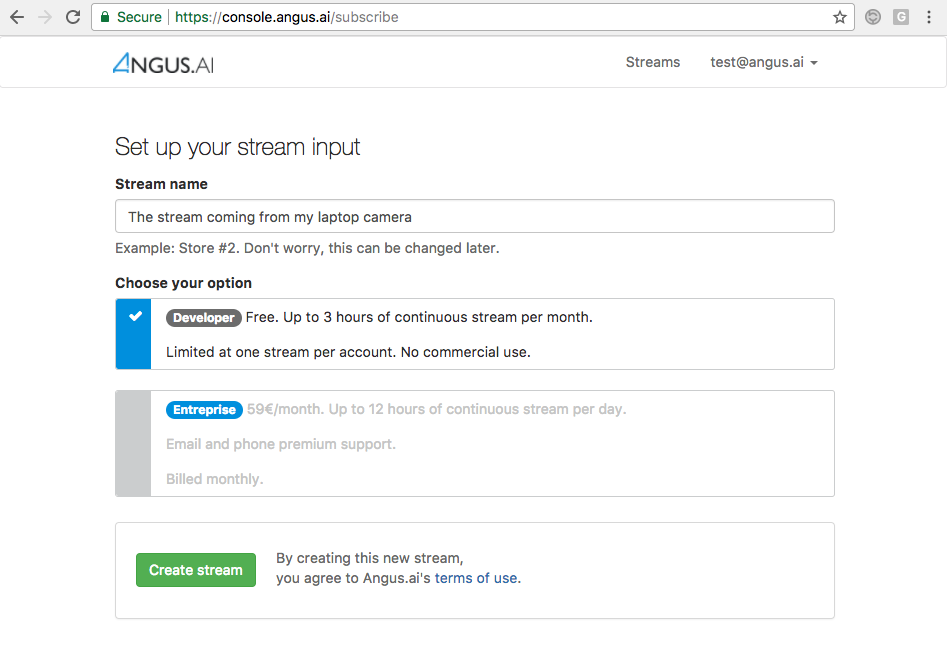
After clicking, you will be asked to choose between a free developer stream and a paying enterprise stream. Please note that the free developer stream is only for non commercial use and will block after 3 hours of video stream computed every month as seen below.
For an non restricted enterprise stream, you will need to enter a valid credit card number.
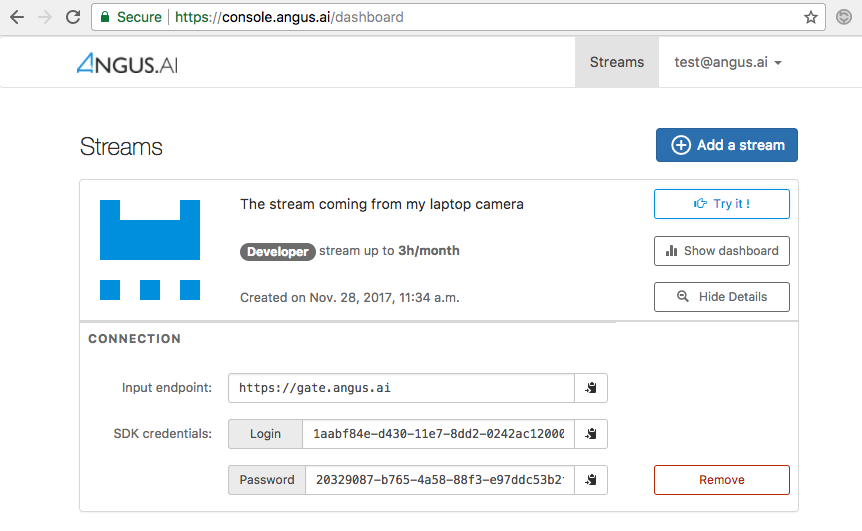
Press “Continue” at the bottom of the page and you will soon get the following page. Press “Show Details” and take note of your client_id (called Login on the interface) and access_token (called Password on the interface) as they will be needed later on.
The credentials that you have just created will be used to configure the Angus.ai SDK. Your are now ready to proceed to the next step.
Download and configure the SDK
Requirements
- The SDK is Python3 compatible but the documentation code snippets are only Python2 compatible.
- Also, you might want (not mandatory) to create a python virtual environnement with virtualenv in order to install the sdk in there.
To do so, please refer to the following virtualenv guide for more information.
Install the SDK
Open a terminal and install the angus python sdk with pip. If you do not use virtualenv you may need to be root, administrator or super user depending on your platform (use sudo on linux platform).
$ pip install angus-sdk-python
Configure your SDK
You must configure your sdk with the keys you received by creating a stream here. These keys are used to authenticate the requests you are about to send.
Your API credentials can be retrieved by clicking on “Show details” on the stream you just created.
In a terminal, type:
$ angusme
Please choose your gateway (current: https://gate.angus.ai):
Please copy/paste your client_id: xxxxxxxx-xxxx-xxxx-xxxx-xxxxxxxxxxxx
Please copy/paste your access_token: xxxxxxxx-xxxx-xxxx-xxxx-xxxxxxxxxxxx
Fill in the “client_id” prompt with the “login” given on the interface and the “access_token” prompt with the “password” given on the interface.
On Windows system, if angusme does not work, please refer to the FAQ for more details.
You can check this setup went well by typing the following command and checking that our server sees you:
$ angusme -t
Server: https://gate.angus.ai
Status: OK
If this command gives you an error, check that you enter the right “client_id” and “acccess_token”. You can do this by re-typing “angusme” in a command prompt.
If you need help, contact us here : support@angus.ai !
Download and launch the client application
Our client app is a lightweight, open source Python script.
It performs two basic tasks:
- retrieve a valid video stream. By default, one of the connected USB camera will be chosen, but you can easily modify the client app to open a different camera and even open a video file.
- package and send the video stream over https to our computation servers. This part can also be optimized for your needs (image resolution, frame rate, etc...).
If you need help to perform these optimizations, please contact us at support@angus.ai.
Prerequisite
- you have a working webcam plugged into your PC
- you have installed OpenCV2 and OpenCV2 python bindings. Please refer to OpenCV documentation to proceed, or check FAQ chapter.
On Debian-like platform, OpenCV2 comes pre-installed, you just need to run
$ sudo apt-get install python-opencv
Note also that OpenCV2 is not an absolute pre-requisite, the following code sample can easily be adapted to be used with any other way of retrieving successive frames from a video stream.
Client App
Please copy/paste the following code sample in a file and run it.
# -*- coding: utf-8 -*-

import cv2

import numpy as np
import StringIO
import datetime
import pytz
from math import cos, sin
import angus.client

def main(stream_index):
    camera = cv2.VideoCapture(stream_index)
    camera.set(cv2.cv.CV_CAP_PROP_FRAME_WIDTH, 640)
    camera.set(cv2.cv.CV_CAP_PROP_FRAME_HEIGHT, 480)
    camera.set(cv2.cv.CV_CAP_PROP_FPS, 10)

    if not camera.isOpened():
        print("Cannot open stream of index {}".format(stream_index))
        exit(1)

    print("Video stream is of resolution {} x {}".format(camera.get(3), camera.get(4)))

    conn = angus.client.connect()
    service = conn.services.get_service("scene_analysis", version=1)
    service.enable_session()

    while camera.isOpened():
        ret, frame = camera.read()

        if not ret:
            break

        gray = cv2.cvtColor(frame, cv2.COLOR_BGR2GRAY)
        ret, buff = cv2.imencode(".jpg", gray,  [cv2.IMWRITE_JPEG_QUALITY, 80])
        buff = StringIO.StringIO(np.array(buff).tostring())

        t = datetime.datetime.now(pytz.utc)
        job = service.process({"image": buff,
                               "timestamp" : t.isoformat(),
                               "store" : True
        })
        res = job.result

        if "error" in res:
            print(res["error"])
        else:
            # This parses the entities data
            for key, val in res["entities"].iteritems():
                # display only gaze vectors
                # retrieving eyes points
                eyel, eyer = val["face_eye"]
                eyel = tuple(eyel)
                eyer = tuple(eyer)

                # retrieving gaze vectors
                psi = 0
                g_yaw, g_pitch = val["gaze"]
                theta = - g_yaw
                phi = g_pitch

                # Computing projection on screen
                # and drawing vectors on current frame
                length = 150
                xvec = int(length * (sin(phi) * sin(psi) - cos(phi) * sin(theta) * cos(psi)))
                yvec = int(- length * (sin(phi) * cos(psi) - cos(phi) * sin(theta) * sin(psi)))
                cv2.line(frame, eyel, (eyel[0] + xvec, eyel[1] + yvec), (0, 140, 0), 3)

                xvec = int(length * (sin(phi) * sin(psi) - cos(phi) * sin(theta) * cos(psi)))
                yvec = int(- length * (sin(phi) * cos(psi) - cos(phi) * sin(theta) * sin(psi)))
                cv2.line(frame, eyer, (eyer[0] + xvec, eyer[1] + yvec), (0, 140, 0), 3)

        cv2.imshow('original', frame)
        if cv2.waitKey(1) & 0xFF == ord('q'):
            break

    service.disable_session()

    camera.release()
    cv2.destroyAllWindows()

if __name__ == '__main__':
    ### Web cam index might be different from 0 on your setup.
    ### To grab a given video file instead of the host computer cam, try:
    ### main("/path/to/myvideo.avi")
    main(0)
To run it:
$ python yourcopiedfile.py
You should see two green vectors showing what your are looking displayed on your screen:
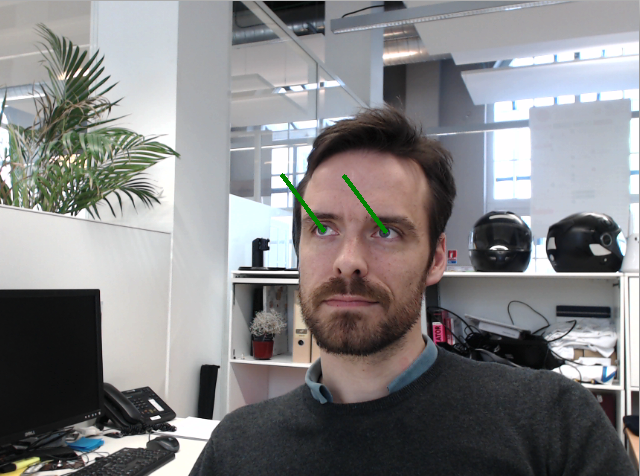
The application displays by default a live view of your stream, with gaze vectors super-imposed. If you need it, it is also possible to display age, gender, emotion, etc... Please refers to the app real-time API here : (Output API).
Step 3 - Online Dashboard
The client app you just ran is now feeding a personal and secured database with audience analytics data that you can check by following the steps below.
How to view your dashboard
The collected data are meant to be collected programmatically through Angus.ai Data API (see Retrieve your data). But for demonstration purposes, we have put together a standard dashboard that allows for a simple visualization over your collected data.
We will use this default dashboard to check that your installation is properly set and that your data are properly stored. But you can also use it for demonstration and even for real world deployment purposes, if it suits your needs.
To view your dashboard:
- Go back to your personal account here: https://console.angus.ai/
- Click on the “Show Dashboard” button on the stream you created above.
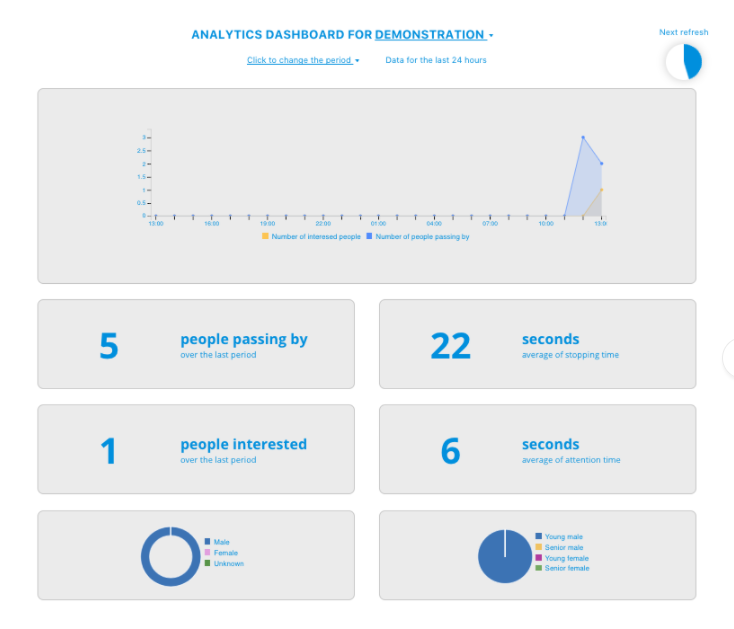
- You should see a page showing a dashboard (see example below). If you just launch the client app as explained here (Client app), your dashboard might still be empty. Indeed there is about 1min time delay between what happen in front of your camera and the dashboard refreshing for these data. After waiting for the next automatic refresh (see the watch icon on the top right hand corner), your first collected data should appear (as shown on the screenshot below).
- If your don’t see data appear, please try to get out of the camera field of view and re-enter again.
What are these metrics?
People passing by: Count of people who passed (not necessarily stopping or looking) in front of the camera for at least 1 second.
People Interested: Count of people who stopped for at least 3 seconds and looked in the direction of the camera more than 1 second, during the specified time duration.
Average stopping time: Average time a person, among the “interested” people (see above), stay still in front of the camera (in second).
Average attention time: Average time a person, among the “interested” people (see above), spend looking at the camera (in second).
Age Pie Chart: Population segmentation counts of all the “interested” people (see above) for each category.
Gender Chart: The gender repartition of all the “interested” people (see above).
Congratulations, you now have a properly running installation of our audience analytics solution.
If you want to retrieve these data programmatically (for further integration into your own dashboard for example), you have got one more step to go.
Step 4 - Retrieve your Data
Here is a short section to help you get started in retrieving your audience data programmatically. Check our API reference for further details. (Retrieve your data)
Getting your JWT Token
You need a JSON Web Token (“JWT”) token in order to securely call the data api endpoint. Your personal JWT is provided by programmatically calling the appropriate endpoint documented below.
Please use your angus.ai in the command line below:
- account
username(it should be your email address) - Stream
client_id - Stream
access_token
You can find these credentials on http://console.angus.ai.
Request:
curl -X POST -H "Content-Type: application/json" -d '{"username": "aurelien.moreau@angus.ai", "client_id": "xxxxx-xxxx-xxxx-xxxx-xxxxxxxxx", "access_token": "xxxxx-xxxx-xxxx-xxxx-xxxxxxxxx"}' https://console.angus.ai/api-token-authstream/
You should get a response as shown below, if this is not the case, contact us.
Response:
{
  "token": "eyJhbGciOiJIUzI2NiIsInR5dCI6IkpXVCJ9.eyJ1c2VybmFtZSI6ImF1cmVsaWVuLm1vcmVhdUBhbmd1cy5haSIsIm9yaWdfaWF0IjoxNTA1Mzk4MDM4LCJleHAiOjE1D8DU0MTYwMzgsImNsaWVudF9pZCI6IjNiZDk1ZjIwLWM2OWYtMTFlNS1hZWVjLTAyNDJhYzExMDAwMiIsInVzZXJfaWQiOjgyNiwiZW1haWwiOiJhdXJlbGllbi5tb3JlYXVAYW5ndXMuYWkifQ.K70YXQYMAcdeW7dfscFGxUhenoXXGBAQTiWhNv-9cVc"
}
Once you obtained your personal JWT, you can start retrieving your data by calling the API endpoints documented in the Data API Reference page.
Example
Here is an example of a request for all entities from 5:45 GMT+2, the 2017, September the 3rd until now, using a time bucket of “one day”.
Request:
curl -X GET -H 'Authorization: Bearer eyJhbGciOiJIUzI2NiIsInR5dCI6IkpXVCJ9.eyJ1c2VybmFtZSI6ImF1cmVsaWVuLm1vcmVhdUBhbmd1cy5haSIsIm9yaWdfaWFfta0IjoxNTA1Mzk4MDM4LCJleHAiOjE1MDU0MTYwMzgsImNsaWVudF9pZCI6IjNiZDk1ZjIwLWM2OWYtMTFlNS1hZWVjLTAyNDJhYzExMDAwMiIsInVzZXJfaWQiOjgyNiwiZW1haWwiOiJhdXJlbGllbi5tb3JlYXVAYW5ndXMuYWkifQ.K70YXQYMAcdeW7dfscFGxUhenoXXGBAQTiWhNv-9cVc' 'https://data.angus.ai/api/1/entities?metrics=satisfaction,gender,category,passing_by,interested&from_date=2017-09-03T05%3A45%3A00%2B0200&time=by_day
Response:
{
    "entities": {
        "2017-09-03T00:00:00+00:00": {
            "category": {
                "senior_female": 0,
                "senior_male": 0,
                "young_female": 0,
                "young_male": 0
            },
            "gender": {
                "?": 0,
                "female": 0,
                "male": 0
            },
            "interested": {
                "value": 0
            },
            "passing_by": {
                "value": 0
            },
        },
        "2017-09-04T00:00:00+00:00": {
            "category": {
                "senior_female": 0,
                "senior_male": 0,
                "young_female": 0,
                "young_male": 8
            },
            "gender": {
                "?": 0,
                "female": 0,
                "male": 10
            },
            "interested": {
                "value": 10
            },
            "passing_by": {
                "value": 18
            },
        },
        "2017-09-05T00:00:00+00:00": {
            "category": {
                "senior_female": 0,
                "senior_male": 0,
                "young_female": 4,
                "young_male": 52
            },
            "gender": {
                "?": 0,
                "female": 4,
                "male": 56
            },
            "interested": {
                "value": 60
            },
            "passing_by": {
                "value": 152
            },
        },
        "2017-09-06T00:00:00+00:00": {
            "category": {
                "senior_female": 0,
                "senior_male": 0,
                "young_female": 0,
                "young_male": 3
            },
            "gender": {
                "?": 0,
                "female": 0,
                "male": 4
            },
            "interested": {
                "value": 4
            },
            "passing_by": {
                "value": 20
            },
        },
        …
        …
        ...
        "2017-09-13T00:00:00+00:00": {
            "category": {
                "senior_female": 0,
                "senior_male": 0,
                "young_female": 0,
                "young_male": 0
            },
            "gender": {
                "?": 0,
                "female": 0,
                "male": 0
            },
            "interested": {
                "value": 0
            },
            "passing_by": {
                "value": 0
            },
        },
        "2017-09-14T00:00:00+00:00": {
            "category": {
                "senior_female": 0,
                "senior_male": 0,
                "young_female": 0,
                "young_male": 43
            },
            "gender": {
                "?": 1,
                "female": 0,
                "male": 59
            },
            "interested": {
                "value": 60
            },
            "passing_by": {
                "value": 153
            },
        }
    },
    "from_date": "2017-09-03T05:45:00+02:00",
    "total_results": 12,
    "nb_of_pages": 1,
    "next_page": "",
    "page": 1,
    "time": "by_day",
    "to_date": "2017-09-14T16:53:11+02:00"
}
What next?
You have a running installation of Angus.ai audience analytics solution. Congratulations!
- When time comes, you can plug more cameras by creating additional stream as shown here (Create new credentials).
- If you need to deploy your system in a situation where internet bandwidth is a problem, or for any issues please contact Angus.ai team at: support@angus.ai, and if possible, please specify your operating system, python version, as well as the error backtrace if any. Thanks!